S5 Pro Shooting Settings: A Primer
Many of us S5 Pro owners have used other Fujifilm cameras like the S1 Pro or S2 Pro. Still others have come to the S5 Pro after being dissatisfied with the work required with other cameras to produce images that seem to come much more easily with Fujifilm SLRs.
However, the S5 Pro is really unlike other Fujifilm SLRs, including the S3 Pro. To assist other users with how to set up and use the S5 Pro, I have prepared this small summary. It's not meant to be all-inclusive or comprehensive by any means, but hopefully it will help people decide how best to set their cameras.
Shooting settings on the S5 Pro are accessible by pushing the "Menu/OK" button on the back of the camera.
**Film Settings:
STD = standard camera performance without film simulations
F1 = negative film setting, more DR
F1a = negative film with more saturation
F1b = negative film, designed for skin tones
F1c = negative film setting, with more sharpness
F2 = Fujichrome. This gives a more slide-film like "snap" and saturated color to images. Some have likened it to being akin to a digital Velvia. I wouldn't recommend this for skintones, but your tastes may vary.
Note: when shooting RAW at 400% dynamic range, Hyper-Utilities will give you options that track with the above settings, but with different names. F1 = pro negative, F1a = F3a, F1b = F3b, etc.
**Dynamic Range Settings:
Auto DR is where the camera chooses the dynamic range. However, this is at the expense of camera speed. The camera will work as though you set the dynamic range at 400%, even if the camera ultimately only decides to output a jpeg at 100% DR.
400% Dynamic range or W2 DR gives you the most dynamic range, but at a price--the camera will be slower (i.e. your frames per second drops from 3 fps to 1.5 fps). Another issue: using 400% when you don't need it will give you duller looking images. Thus, users should either select the DR setting they want or use auto DR, rather than always leaving the camera on 400% DR.
Other settings for DR are 100% (standard), 130%, 170%, 230% (W1), and 300%.
In practice, again, users should avoid just leaving the camera on 400% DR. Auto DR is an excellent choice, but it slows the camera down. 100% works well in many situations, particularly when lighting can be controlled or does not have an excessive range. Thus, indoors, flash shooting indoors, on cloudy days or in a studio setting, 100% is the way to go.
**Color
This setting affects "color density" which I think most of us would call color saturation. Most S5 Pro users want usable jpegs, and setting the camera here is critical.
ORG--the manual doesn't recommend this for out of camera jpegs for viewing/printing, but I disagree. This setting avoids getting overly saturated images.
MEDIUM LOW--more saturated than ORG.
STD--the supposed standard setting, but in actual practice tends to produce skintones that can be too red / too saturated for some tastes.
MEDIUM HIGH and HIGH give even more saturation; I would suggest that these make more sense for landscape shooting or for specific effects.
Generally, ORG or Medium-Low are good for skin tones, I think.
**Tone
This setting is for contrast. Unlike the old S2 Pro, using ORG here is not a good choice, resulting in duller looking images. The manual doesn't recommend ORG either, unless you plan on post-processing.
I like Medium-Soft and STD tone best; the other settings Medium-Hard and Hard are too strong for my tastes.
This is a big switch IMHO from the S2 and S3 Pro where ORG tone was the preferred setting for most people!
**Sharpness
Use OFF if you plan on post-processing, but for out of camera jpegs, STD is plenty. Hard is best for high-contrast images like text. Medium-soft can help with portraits, so you don't see every pore, hair, and skin imperfection.
**Color Space
Your choices here are sRGB and Adobe RGB. If you know what you're doing, Adobe RGB is good. But if you aren't sure, stick with sRGB. sRGB is pretty much standard on many devices, including printers and you'll still get good looking images choosing sRGB. Using Adobe RGB when you haven't set your system and printer up for it is a recipe for mismatched color.
**ISO
ISO 100 is the lowest setting, and the least sensitive setting. Higher ISOs are more sensitive, but you run the risk of more noise in your images as you get closer to 3200, the maximum setting. See Noise Reduction about how to reduce noise.
**White Balance
Auto White-the camera sets the white balance in the image. Users report that they should "fine tune" the white balance in auto to get best results. See WB Fine Tune. The other settings include incandescent, 5 fluorescent settings, fine weather (sunshine/daylight), flash, shade, a specific color temperature in degress Kelvin, and up to 5 custom preset white balances.
**WB Fine Tune
You can adjust the color bias of your White Balance. I like a -1, -1 adjustment here, which helps to control overly red/magenta skintones. Your mileage may vary, obviously.
**Quality
RAW = data off the sensor. Remember also that you have an option here of 100% DR or 400% DR
RAW+jpeg = as the name implies, you get a jpeg file too, in addition to a RAW file.
Jpeg fine and jpeg normal. Fine = least compression highest quality, but normal gives you more images on your memory card.
With RAW, you *must* convert and post process the RAW file, in Finepix Studio or Hyper Utilities or some other utility like Photoshop CS3. And to get film options in Hyper Utilities, you have to shoot at 400% DR in RAW.
**Recording Pixels
This determines the size of your image in pixels, how large you can print without artifacts, and how big your files will be. L = 12 megapixels, M = 6 megapixels, S = 3.5 megapixels. The more megapixels, the bigger your can print, but your file sizes will be bigger. Generally, 6 megapixels is plenty, but if you plan on cropping or making huge enlargements, go for 12 megapixels.
Don't confuse megapixels with megabytes. In other words, don't expect a 6 megabyte size file from a 6 megapixel setting. It's normal to get around a 3 to 4 megabyte jpeg file at 6 megapixels.
**Noise Reduction
Two simple settings here: ORG and STD. ORG is a low-level of noise reduction and STD is a higher level. Generally ORG is pretty good for most situations, but at higher ISOs you may want STD noise reduction. Some people find the noise reduction to be too intrusive (smoothing/loss of detail/pattern noise/grain), and if this is the case for you, try ORG instead.
Labels: dSLR, Fujifilm, S5, settings, SLR
Dynamic Range Torture Test
One of the interesting features of the S5 Pro is the expanded dynamic range feature. But, does it really make a difference that can be seen? I came up with the scenario that I might typically use--photographing someone inside a car without a flash, while hoping to keep as much of the detail outside the car windows. This would be roughly equivalent to photographing someone inside a house against a window and wanting to keep the outside scene through the window visible.
Now, normally what I would do is meter for the exterior, adjust the camera to ensure the shutter speed is at or slower than sync speed, and use a flash. This keeps the dynamic range within what a camera can handle. However, sometimes I don't want to use a flash or a flash will ruin the look I want.
Sadly, I didn't have a model handy for this torture test, but maybe in a few weeks...
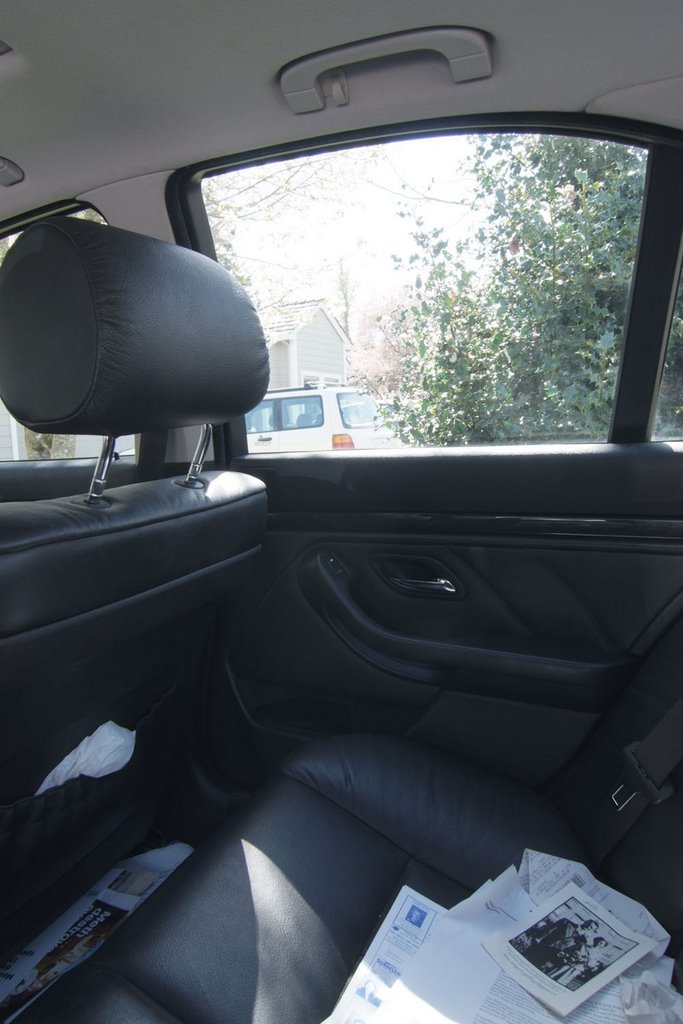
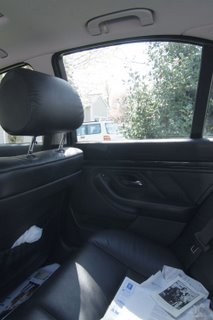
So, here's the overall layout. It's a black interior of my auto on a sunny day. In the background is a neighbor's house. This shot was taken with the S5 Pro at the 400% DR setting, manual exposure at 1/15 and f/11 at ISO200. The meter actually recommended (correctly) 1/60 at f/11, but I deliberately set the shot at 1/15 to match what the D50 meter recommended for the D50 and to pick up more detail of the interior of the car:
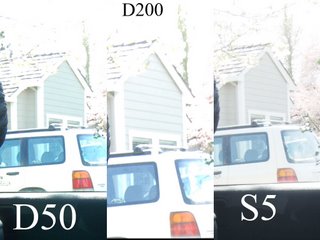
Now, here's how three cameras, the D50, the D200, and the S5 Pro compare. These are 100% crops, which is why the D200 has a "zoomed" image look to it. All three cameras were at 1/15 and f/11 at ISO 200. Notice how the S5 Pro retains not only details from the tree in the background, but also shows a branch just outside the car window, in front of the roof. You'll probably have to click on the image to see the full-size comparison.
When I can get a real human to pose in the car, I'll redo this torture test. But in the meantime, be aware that the DR feature of the S5 Pro is real and it can make the difference between a white fluffy cloud and just a white blob in the sky.
Initial Review of the Fujifilm S5 Pro
I finally have had enough time to sit down with a human and take some photos with the Fujifilm S5 Pro and make a real comparison with my other main camera, the Nikon D200. Lots of people have been wondering:
1) Which camera is better, the S5 Pro or the D200?
2) Are 6 megapixels enough or does the higher resolution of the D200 carry the day?
3) Is the dynamic range feature of the S5 Pro a real feature or just a gimmick?
4) Is the S5 Pro significantly slower than the D200, enough to make a difference in getting a photograph or not?
So, I'll try to answer some of these questions with this mini, initial review.
First off, handling the cameras and working with both of them, the first thing to notice is that both cameras use essentially the same body, that of the Nikon D200. If you pick up each camera, you can't detect any differences in how each camera feels in the hand. If you like the feel of the D200, you'll like the feel of the S5 Pro (and vice versa).
Fujifilm has modified some of the button layouts on the back of the camera compared with the D200. Perhaps the most significant of these is the "face detection" button on the lower left corner of the S5 Pro, which allows the photographer to magnify images to check focus and exposure on faces in the photographs. Note that face detection only works
after the image has been taken. Unlike point and shoot cameras with face detection technology, an SLR camera cannot yet use face detection before the photo is taken because of the current SLR designs which use a mirror and pentaprism to deliver a live image to the eye-level viewfinder.
By comparison, point and shoots use the actual imaging sensor to deliver their images to an LCD, allowing the face detection software to work on a live image.
It's too bad that Fujifilm has gotten away from their very good design for menu controls used in the S1 Pro, S2 Pro, and S3 Pro cameras. The old 4-button controller under the LCD icon is superior in my opinion to the Nikon button layouts and nested menus, as it allowed quick access to the most used settings without a lot of layered menus. For the S5 Pro, Fujifilm has created a TWO nested menus controlled by different buttons. Pushing the button labeled "menu/ok" leads to a shooting menu of three tabs; pushing the button labeled "setup" leads to a two tab menu for camera setup. Worse yet, Fujifilm has a line here labeled "Shooting" which has options not found in the shooting menu.
Example: to set the amount of time the self-timer should delay, that's in the "Setup" menu under "Shooting." The "Shooting Menu" under the "Menu/OK" button doesn't have a way to change the self-timer delay.
The menus themselves are clear and easy enough to understand, but the menu
system itself has the feel of a kludgy, no-thought-went-into-this system. After the previous Fujifilm cameras with their easier system, Fujifilm users deserve better.
Another gripe, this time related to the use of the D200 body: the switch to control the AF/manual focus system is positioned in such a way that it's possible to accidentally take the S5 Pro (or D200) off autofocus when holding the lens when zooming/focusing. I've done it myself with the D200, and I've learned to avoid it, but new users may run into this.
The rest of the camera and controls are pretty much straightforward. Formatting memory cards requires that two widely spaced buttons be pushed twice, just like on Nikon dSLRs. The LCD is big, bright, and clear. The compact flash door opens right into the users hand, which takes a bit of getting used to. I like the older system of the earlier Fujifilm SLRs, which had a flip down door on the back, but the D200 design requires Fujifilm to use the side system. The S5 Pro only takes 1 compact flash card at a time; no longer can Fujifilm users have two memory slots at their disposal.
The use of the D200 design means that the S5 Pro now takes a dedicated lithium battery. It's identical to the D200 battery, but it's not interchangeable with the D200 battery. The Fujifilm NP-150 battery won't work in the D200, and the EN-EL3e of the D200 won't work in the S5 Pro, although they are of identical form factor, voltage, and capacity. Battery life is excellent for the Fujifilm NP-150, and I was easily able to get the 300 advertised images with a fully charged battery, with a lot of "chimping" (viewing) of the LCD after the images were taken. The battery will hold a charge for a long time, an advantage over the old AA system of the S1,S2, and S3 Pro cameras.
For those who want to use AA's, the D200 battery grip will fit onto the S5 Pro. However, if you want to use the proprietary lithim batteries, you will need to buy the Fujifilm version to use the battery grip.
One important improvement of the S5 Pro over older Fujifilms is the incorporation of i-TTL, Nikon's state-of-the art flash system known as the Creative Lighting System. This system fires a quick preflash to judge exposure, then fires the actual flash for the photo. The preflash occurs before the mirror flips up, but the quick return mirror keeps the preflash delay to a minimum, unlike the older D70, where the preflash was distinctive enough to cause some subjects to blink during the main flash.
In actual shooting, the S5 Pro behaves pretty much like a Nikon D200 with a Fujifilm wide dynamic range sensor inside. That means great color, great out of camera jpegs, good focusing even in dim light, and good flash exposures. However, it also means that the camera will be slower in some settings and won't be able to take as many burst shots as the D200. The D200 can shoot at up to 5 frames per second; the S5 Pro manages 3 frames per second in regular dynamic range and 1.5 frames per second in wide dynamic range settings. Putting the camera on auto DR will also slow the camera down to 1.5 fps. Likewise, RAW shooting with wide DR setting will reduce the buffer depth down to 7 or 8 shots before the camera stops to write. As images clear the buffer, the camera will unlock and allow images to be taken again. Expect a wait of up to 20 seconds before the camera flushes the first RAW image out of the buffer. Users who don't shoot RAW or don't shoot big bursts are unlikely to find the camera to be slow. For sports shooting, the S5 Pro is acceptable, but the 5 fps of the D200 may make that camera more suitable for some types of sports shooting.
The S5 Pro is missing a few features compared to the D200. Missing features include the built-in intervalometer, the 30 second mirror lockup shutter release (this appears to need a firmware fix), and the great menu banks of the D200. This latter feature is a big loss; apparently Fujifilm feels that their film simulation modes make up for the loss of custom menu banks.
So, which camera is better? That will depend upon your style of shooting and your needs. That said, there's no question in my mind that the S5 Pro has much better image quality, especially at ISOs above ISO 400, where the D200 is very noisy. Color is more pleasing to my eye from the Fujifilm, and Fujifilm skintones are legendary. It doesn't take a lot of work to get great color from this camera. However, there is a cost in speed. The dynamic range feature will slow the camera down, which can make the camera less practical for some users.
As for resolution, there's no practical difference as the images below will show. At this level, the biggest variables are going to be the skill of the photographer and the quality of the lens used. Some stock companies have megapixel requirements which may push the S5 Pro out of contention, but otherwise, I wouldn't fixate on the 10 mp vs. 6mp debate with the S5 Pro. A 6mp image from the S5 Pro is very high quality and holds its own against a 10mp image from the D200, at least in jpeg. RAW comparisons will have to wait until the release of the HyperUtilities 3 in the U.S.
The dynamic range feature of the S5 Pro is real and practical. It's not a gimmick. But it means you'll get bigger RAW files and slower in-camera processing and fps numbers.
The S5 Pro is quick enough for most applications, although some sport shooters should probably look elsewhere for a digital SLR solution.
Now, on to the images...
Here's a shot of model Isis, taken with the S5 Pro and the D200, daylight WB, 1/125 at f/8 with the same lens, with out of camera jpeg output. The D200 was set to custom imaging, with minus tone comp, medium high sharpening, color mode I, sRGB, +3 hue. These settings are my own for getting decent skin tones out of the D200. The S5 Pro was shot in F1c color mode, which is designed for portraits with higher than default sharpening.
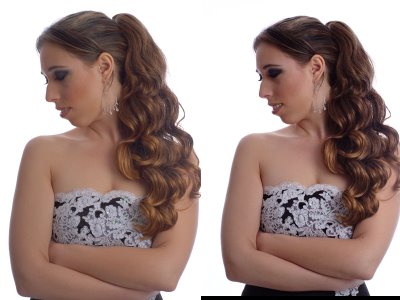
Next are 100% crops from these two photos. You can see that there's little difference in resolution between the two cameras, and that the variable is likely to be the photographer, not the camera.

This is obviously just an initial review. As Fujifilm releases its RAW software, I will update this review and take more photos.
The bottom line? The S5 Pro is fully capable of taking fantastic photos, and Fujfilm users finally have a camera body worthy of the very good sensor inside. There's a few rough edges that Fujifilm has to fix, like the menu system, but nevertheless, there's no denying that great Fujifilm color, which is subtle but very pleasing to the eye.
Why Did Fujifilm Do This?
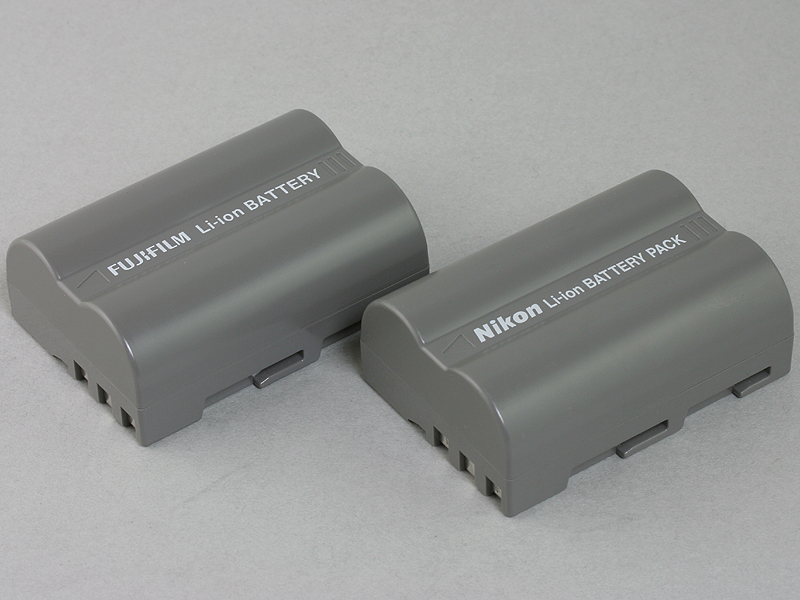
The upcoming Fujifilm S5 Pro is due to be released around the end of January 2007. Based on the D200 body, it uses a D200 battery--sort of. Instead, Fujifilm engineered the camera so that it will only work with the Fujifilm version of the D200 battery. Nikon calls their battery the EN-EL3e, while Fujifilm calls their battery the NP-150. Both are 7.4 volts and 1500 mAh batteries.
Physically, the batteries almost identical. Take a look:
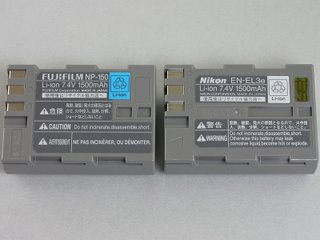
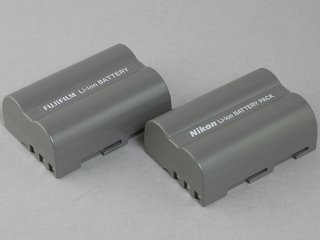
As you can see, the batteries look virtually identical, with the exception of the shorter notch on the Fujifilm version of the battery. I have to wonder whether or not there's a switch in the Fujifilm S5 Pro that can sense whether the notch is there; if so, that may be the key difference between the batteries and not the internal chip of the battery. Probably one of hte first things I'll do will be to inspect the battery compartment of the S5 Pro.
So why did Fujifilm do this? Apparently, it was just to get some battery sales--a lousy reason. Many potential Fujifilm S5 Pro buyers are already users of the Nikon D200 and battery compatibility would have been a great impetus for D200 users to get an S5 Pro as a second camera. It's not known if the Fujifilm battery will work in the D200. A check of my D200 compartment shows no switch there to correspond to the notch, so it's possible, unless the difference is the internal battery chip.
Another question relates to AA compatibility. Previous Fujifilm SLR cameras used AA batteries for power, a source of both praise and damnation. Some users like the ease of availability and affordability of AAs while critics disliked the shorter life of AAs compared to lithium ion batteries.
The answer here is that the S5 Pro is the first Fujifilm digital SLR to be based on a true digital SLR, while prior Fujifilm SLRs were based upon film cameras. The S1 Pro was based on the film Nikon N60, while the S2 Pro and S3 Pro were based on the Nikon N80 film body. As a result, Fujifilm grafted the digital capture portion of the camera onto the film body, creating what some critics called a "Frankencamera." In doing so, Fujifilm used AA's as the power source, rather than develop a lithium ion battery pack.
For the S5 Pro, the use of an existing digital body, the D200, meant that Fujifilm had to keep the same power system to power the camera--but with the twist that only a Fujifilm battery would work. It's possible that a firmware fix or firmware hack might change this, but users shouldn't have to resort to this. Fujifilm should ensure compatibility between the battery systems, thus encouraging users to buy and use the S5 Pro in addition to the D200. Of course, Nikon might not like the idea of potention D200 buyers going for Fujifilm, so the battery issue actually helps Nikon.
Your Card Reader Makes a Difference
Most of us upload images from our memory cards to a computer via a USB card reader. However, the speed of that upload is greatly affected not only by the card speed, but also by the reader!
First, USB 2.0 comes in different "flavors." USB 2.0 "full-speed" is the same as the old USB 1.1 standard, 12 megabits per second. USB 2.0 "high-speed" is theoretically much faster, at 480 megabits per second. In actual practice, there's some overhead so that speed is never actually reached.
Most people buy a card reader labeled USB 2.0 and a fast card--never realizing that there's big differences in USB 2.0 card readers.
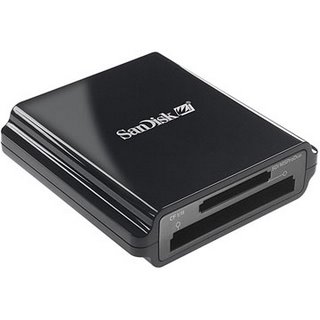
I did some timings myself today and was surprised. I used two different Sandisk card readers, the Sandisk 8 in 1 card USB 2.0 card reader and the Sandisk Extreme USB 2.0 card reader.
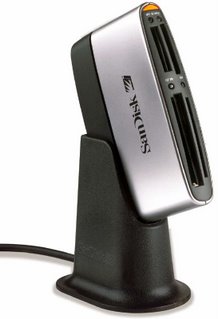
The Sandisk 8 in 1 USB 2.0 card reader and Extreme USB 2.0 reader. Both are "high-speed."
Both readers are supposed to be USB 2.0 high speed. To test, I moved files from a couple of compact flash cards to my Dell Inspiron notebook via the USB 2.0 port on the computer. The results were...well, stunning.
Test One: 236 megabytes from Sandisk Ultra II 256MB card
Sandisk 8 in 1: 1 minute, 49 seconds
Sandisk Extreme: 24 seconds
Test Two: 1.48 gigabytes from a Kingston Elite Pro 50x 2GB card
Sandisk 8 in 1: 11 minutes, 52 seconds
Sandisk Extreme: 3 minutes, 58 seconds
In other words, although both card readers are USB 2.0 High Speed, one card reader is about 4 times faster than the other.
So, if you've ever wondered if your card reader is slowing you down, now you know. Your card reader makes a difference.
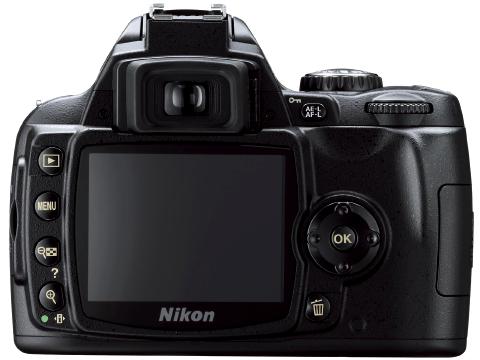
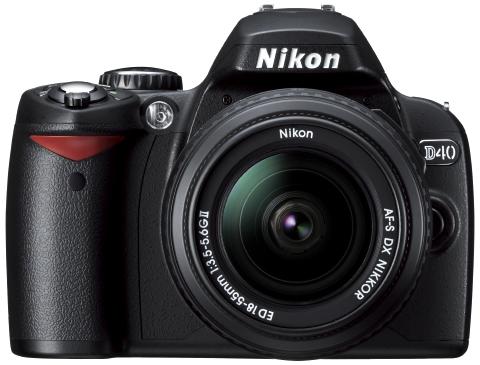
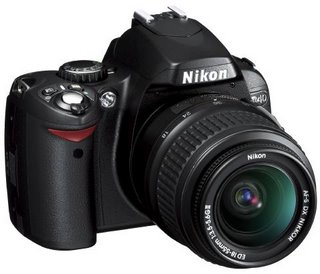
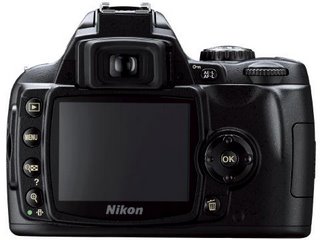
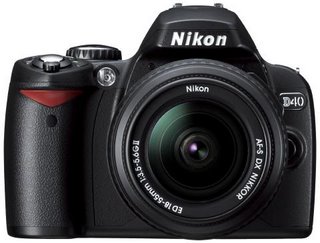
Nikon to Release D40...Apparently!
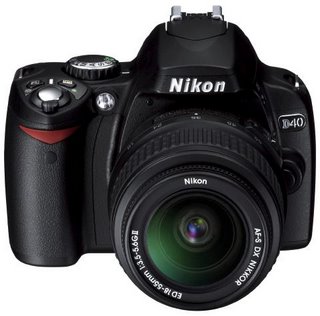
Thanks to a huge error by a German department store, specifications for a new Nikon camera, called the D40, were released to the public prematurely. The new camera is scheduled for release in December, apparently as a replacement for the Nikon D50.
So, what are the specs?
Here you go:
- 6.1 megapixel sensor--identical to the Nikon D50 and D70s.
- No optical stabilization; no vibrating sensor to fight dust.
- Most importantly: No autofocus motor built into the camera. Only lenses with a built-in motor will work with this camera. That's Nikon AF-S lenses and Sigma HSM lenses. Other autofocus lenses will only work in manual.
- Fewer autofocus sensors--only 3, instead of the D50's 5 sensors.
- The camera will use a significantly smaller and lighter body than the D50, and the battery will be the EN-EL9, instead of the higher capacity EN-EL3 of the D50.
- SD memory, of course.
- Flash sync: 1/500, with i-TTL.
- Metering: 420 segmented matrix metering
One last thing: Nikon expects to introduce a new entry level AF-S lens, the 18-55 AF-S f/3.5-5.6 lens, as the "kit lens."
Unusually Useful Software for Photographers
Have you ever wondered how a photographer managed to make that spectacular shot? Or have you ever wondered whether an image you saw online was processed in Adobe Photoshop using Adobe Camera Raw, instead of being shot in jpeg? Well, a truly useful piece of software is Opanda's iExif viewer. With iExif, you can right-click on the image in question, select iExif from the drop down menu and instantly view all the available EXIF data stored within the image itself, including things like shutter speed, aperture, white balance settings, flash usage, metering modes, and even lens focal length. Best of all, iEXIF is FREE. That's right, FREE. Here's the link:
http://www.opanda.com/en/iexif/index.htmlNow for printing, I swear by Qimage. It's designed for printing, not image editing. So, you can print proofs, contact sheets, pre-set sizes, and a whole lot more. You can change background printing colors, add text to photos, or even put the file name on each print. Qimage can be found here:
http://www.ddisoftware.com/qimage/ Unfortunately, it's not free, but upgrades are free for as long as ddisoftware sticks around.
Finally, one of the most useful tools is a file viewer. Camera companies love to ensure that they use proprietary file formats. As a result, if you're a Canon user, you can't see Nikon NEF files (or vice-versa) without using an expensive program like Photoshop---unless you use a free third-party file viewer, like Irfanview. This viewer is fantastic, because you can see Nikon NEF's, Canon CR2, Pentax PEF, Fujifilm RAF, Adobe DNG, Olympus ORF, and even Sigma's raw format. More than that, Irfanview also reads JPEG2000 files, a host of audio files like ogg vorbis, MP3, ASF, and others. Best of all, Irfanview is also
FREE. Here's that link:
http://www.irfanview.com/So, check out these software options, and I'll bet you find them useful too in your work.
Image Quality versus Megapixels
With Photokina safely behind us, it's time to evaluate where the industry is going. We really have seemed to hit a line in the megapixel wars, with no magical increases in megapixels. The Nikon D2xs is probably about as big as an APS sized sensor is likely to get at 12.4 megapixels, while Canon's 1Ds Mark II tops out at 16.7 megapixels on a 35mm frame-sized sensor.
Realistically, anything more than these numbers and issues like diffraction take away from image quality.
Not too surprisingly, Fujifilm is going in a totally different direction--their proposed S5pro, the successor to the S3pro, remains with a 6 megapixel imager that has 12 megapixels of sensors. Fujifilm did not up their megapixel counts as many had hoped.
Why? Fujifilm claims that it has chosen to focus on image quality as paramount--low noise images with lots of dynamic range.
Is Fujifilm right? Well,I'd say it's safe to say that Fujifilm is betting the company on it.